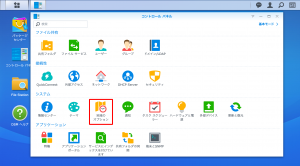
- Go to Control Panel > QuickConnect.
- Check the Enable QuickConnect box.
- If you do not have a Synology Account, click Log in to or register a Synology Account. ...
- Create your own QuickConnect ID in the QuickConnect ID field. ...
- If you do not see the QuickConnect DSM link, click Advanced and make sure DSM is enabled.
How do I access my Synology NAS from anywhere?
Access Your Synology NAS from Anywhere with WebDrive WebDrive gives you remote access to shared files on your Synology NAS, allowing you to access your NAS as though it were a local device. With WebDrive, you can easily map a network drive to Synology NAS and connect via WebDAV.
How do I create a QuickConnect ID for my Synology NAS?
Next, click the “Log in to or register a Synology account” option. You probably already created a Synology account when you set up your NAS, so just log in using your credentials, and then hit the “Log In” button. If you haven’t already signed up for an account, you can do that here as well. After you log in, create a QuickConnect ID.
How do I download files from Synology to my computer?
RELATED: How to Download Files with Your Synology NAS (and Avoid Leaving Your Computer On at Night) In the Control Panel window, click the “QuickConnect” setting. Click the “Enable QuickConnect” check box to enable the feature. Next, click the “Log in to or register a Synology account” option.
What is a Synology account and how do I use it?
Different from DSM user accounts, which can be used to sign in to DSM, a Synology Account allows you to manage your billing information, registered Synology products, requests for technical support, and Synology online services (e.g., QuickConnect, DDNS, and Synology C2).
See more

Can you access Synology NAS remotely?
External access is the ability to remotely access your Synology NAS from any device with an internet connection. DSM allows you to easily set up remote access to your Synology NAS, so you can sign in to DSM or other services by simply entering a custom domain name into your web browser.
How do I securely access my Synology NAS from anywhere?
In the My Devices list, press and hold the NAS IP to copy it. Now go to DS file, DS audio, or any of the other Synology mobile clients that you want to use, and paste the NAS's Tailscale IP in the Address field. Then enter your NAS username and password, and hit Sign In to access the server. That's all there is to it!
How do I remotely access my NAS?
How to Remotely Connect to Your DeviceStep 1: Enable FTP.Step 2: Enable WebDAV.Step 3: Update User Permissions.Step 5: Use Dynamic DNS to Assign a Web Address to Your Home Network.Step 6: Set Up Your Remote Connection.Step 7: Enter and Save Your Password.More items...•
Why can't I access my Synology NAS remotely?
For Synology NAS. Check if QuickConnect is enabled. For DSM 6.2: Go to Control Panel > QuickConnect and ensure the Enable QuickConnect checkbox is ticked. Afterward, confirm the services you wish to access via QuickConnect are enabled at the Advanced tab.
Is Synology QuickConnect a security risk?
With SSL enabled, data transmission over the network virtual tunnel is secured with end-to-end encryption. Therefore, QuickConnect guarantees confidentiality and integrity of data transmission between the Synology NAS and client devices.
How do I map my Synology drive outside the local network?
How to Map Synology NAS Drive Outside the Local Network (Over Internet).Set up WebDav on Synology NAS device.Assign a Static IP Address on Synology NAS.Obtain a Free Domain Name using a DDNS Service.Setup Port Forwarding on your Router.Set up DDNS on Synology NAS Device.More items...
Can you access a network drive remotely?
To learn how to access a network drive remotely, open File Explorer on your computer. Right-click “Network” and then click “Map Network Drive” from the menu that pops up. Then select a letter to assign to the drive, tell your computer where the folder is, and whether to connect at sign-on.
Can I access my NAS from a different network?
Answers. Hi, You cannot access NAS when you in different network workaround. You need to set a VPN server on your home machine, then in your office, use VPN to remove logon to your home pc then access NAS.
How do I access Synology NAS remotely Ddns?
2:118:42How to Access a Synology NAS Remotely with DDNS (Tutorial)YouTubeStart of suggested clipEnd of suggested clipSo once you've created or logged into your synology. Account go to external. Access select ddns. AndMoreSo once you've created or logged into your synology. Account go to external. Access select ddns. And then select add at this point you can select the service provider as synology.
Is Ddns faster than QuickConnect?
As for Synology QuickConnect vs Dynamic DNS, it's a matter of convenience vs control, speed, and privacy. In any case, you can always use both — you'll note how DDNS is much faster than QuickConnect.
How do I access Synology NAS via DDNS?
Setting up DDNSGo to Control Panel > External Access > DDNS.Click Add.A dialog box appears prompting you to edit the following settings: ... Click Test Connection to see if settings are correct.If you select Synology as the service provider, you can configure the following settings: ... Click OK to save and finish.
How do I use Synology with QuickConnect?
QuickConnectGo to Control Panel > External Access > QuickConnect.Check Enable QuickConnect.If you have not logged in to your Synology Account, a login window will pop up. Enter your existing Synology Account information or register a new account on the window.Specify a new QuickConnect ID. ... Click Apply.
How do I access Synology drive server?
For DSM 7.0 and above: Go to Control Panel > External Access > QuickConnect, click Advanced Settings > Permission, and tick to enable Synology Drive Server.
Prerequisites
The rest of this guide assumes that you have a couple components already installed. If not, please following these instructions first:
Sign up for Twingate
Twingate Starter is a new free plan that is designed for home and personal use. If you don’t have an account already, please click here and follow the simple steps to sign up for a Starter account and begin the initial setup. Creating an account is simple and you can choose to sign up using a Google, Github, or other existing account you have.
Add a Connector
The Twingate Connector is a piece of software that allows for secure access to your remote network and the devices connected to it (in this case, your Synology NAS). For it to work, you first need to deploy the Connector on your Synology NAS.
Add a Resource
You’ve now set up a Connector on your Synology NAS. This Connector enables remote access for any device or service on your home network (called a “Resource” in Twingate). Go back to your Remote Network and click on the “Add Resource” link. You’ll see a popup like the one below.
Set up the Twingate client
All that’s left to do now is to install Twingate on your device (we support Windows, Mac, Linux and have apps for iOS and Android) and access your Synology NAS. As an example, let’s walk through setting up the Twingate client on iOS.
Sharing is Caring
Do you want to share access with a family member? You can easily do this from the Twingate web UI. Just go to the Team tab and click “Invite User” to send an email invitation. The recipient would simply follow the same steps to download the Twingate client, join your network, and get access to your Synology NAS, or any other resource you set up!
Physical Installation of a Synology NAS
Physical Installation of the hard drives or SSD into the Synology NAS is very, very easy and is completely toolless (for Hard drives, SSD require you to use 4 screws for each that are in the accessories box). Once you have unboxed all the accessories, you need to remove the trays (all of them, or as many as you need for your hard drives).
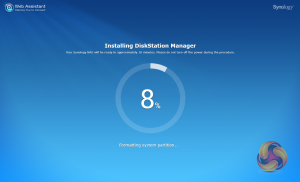
Install DSM 7 using a desktop Web Browser with the Web Assistant
Your Synology NAS comes with a built-in tool, Web Assistant, which helps you download the latest version of DSM from the Internet and install it on your Synology NAS. To use Web Assistant, follow the steps below: 1. Power on your Synology NAS. 2.
Install DSM 7 with Your Mobile with the DS finder Application
You can also install DS finder (App Store/Google Play Store) on your mobile device to install DSM as demonstrated below: 1. Power on your Synology NAS. 2. Connect your mobile device to the local network where your Synology NAS is located, and launch DS finder. 3. Tap SET UP NEW NAS to start the setup process. 4.
How to Configure storage space on your Synology NAS with the Storage Manager
This section guides you through the steps of storage pool creation using the built-in package, Storage Manager. When it’s your first time launching Storage Manager, Storage Creation Wizard will help you create and configure storage pools and volumes. A storage pool is a single storage unit consisting of multiple drives.
How to Create a Storage pool and Volume
1. Launch Storage Manager in the Main Menu. Storage Creation Wizard will pop up to lead you through the steps below 2. Choose a RAID type to protect your storage. Some RAID types are available on certain models according to the number of drive bays.
How to Access and Navigate the Synology DSM 7 GUI
After installing DSM on your Synology NAS, you can sign in to DSM using the DSM user account you have just added during the first-time installation. Follow the steps below to sign in via a web browser: 1. Make sure your computer and Synology NAS are connected to the same local network. 2.
Key Navigation Options Options, A Brief Overview
After signing in, you can see the DSM desktop, where your application and package windows are displayed. You can also create desktop shortcuts to frequently used applications. why are you copying me!
Overview
With QuickConnect, you can easily connect to your Synology NAS over the Internet without the hassle of setting up port forwarding rules or other complicated network settings. QuickConnect allows you to connect via a simple customizable address like Quickconnect.to/example.
2. Share files on your NAS using QuickConnect
With QuickConnect enabled, you can easily share files stored on your Synology NAS to anyone without worrying about port forwarding.
How to access Synology NAS?
How to Configure and Access Synology NAS with WebDAV over Internet. Step 1. Set up WebDav on Synology NAS device. Step 2. Assign a Static IP Address on Synology NAS. Step 3. Obtain a Free Domain Name using a DDNS Service. Step 4. Setup Port Forwarding on your Router.
How to map Synology Drive?
To map the Synology drive, as a Network Drive using the Windows File Explorer: 1.Right-click on the This PC icon in explorer and choose Map Network Drive. 2. At Map Network Drive settings: a. Choose a Drive letter for the mapped sinology folder. b.
How to access NAS from outside of network?
To be able to access your NAS shared files from outside of your local network, you need to forward the port "5006" (on your router) to the NAS IP address (e.g. "192.168.1.199"). To do that: 1. Open your router's administration page.
What is the default port for Synology?
Once you know the IP, you will still need to know the port to access the Synology. Default port is 5000 .
Can you bypass port forwarding on Synology router?
You can bypass port forwarding setup on your router if you proceed with Synology’s Quick Connect. Otherwise, consider what services you need open from the list above. We are steadily building a list of remotely accessible port forwarding setup instructions.