There are many different solutions for remote access to Raspberry Pi
Raspberry Pi
The Raspberry Pi is a series of small single-board computers developed in the United Kingdom by the Raspberry Pi Foundation to promote teaching of basic computer science in schools and in developing countries. The original model became far more popular than anticipated, selling outsid…
Virtual Network Computing
In computing, Virtual Network Computing is a graphical desktop-sharing system that uses the Remote Frame Buffer protocol to remotely control another computer. It transmits the keyboard and mouse events from one computer to another, relaying the graphical-screen updates back in th…
...
5 Ways to Remote Desktop on Raspberry Pi (Windows/Linux/Mac)
- Xrdp.
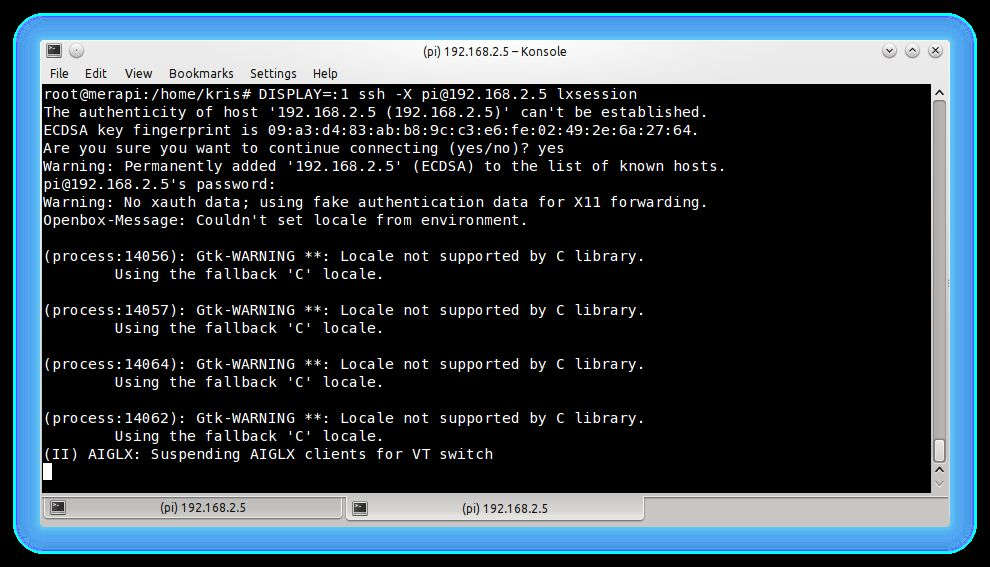
- SSH with X11 forwarding.
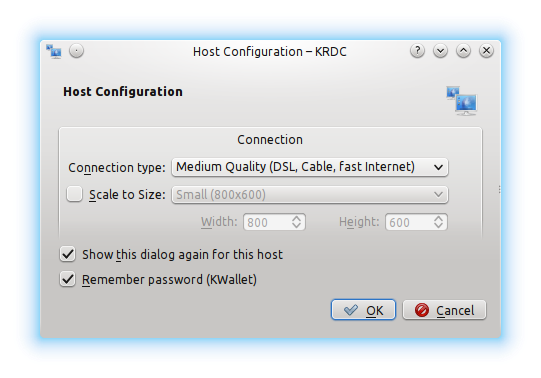
- VNC.
- Teamviewer.
- NoMachine.
How to establish Remote Desktop Access to your Raspberry Pi?
So we learned to connect to the remote desktop in 5 ways:
- With the Xrdp package that provides a Windows-like remote desktop
- With SSH and X11 Forwarding that allows launching an app on the client computer (and not the entire desktop)
- With VNC that enables local access to the Raspberry Pi
- With Teamviewer which allows among others remote access to the Raspberry Pi
Can I run access server on a Raspberry Pi?
Yes — beginning with OpenVPN Access Server version 2.9, you can install Access Server on Raspberry Pi using arm64 with Ubuntu Server. To install, click Get OpenVPN, then click Ubuntu, and select Ubuntu 20 [arm64]. For detailed steps, refer to Installing OpenVPN Access Server on Rapberry Pi.
How to setup your Raspberry Pi?
Story
- Installing Raspberry Pi OS to SD card.
- Write the OS into your SD Card.
- SSH and Wi-Fi Enabling
- Install NMap on your computer.
- Install VNC Viewer on your computer.
- Insert your microSD card into your RPi
- Find your RPi's IP Address.
- Get into you Pi
- View desktop of RPi (Finally!)
How to access Raspberry Pi terminal?
Establishing a direct connection
- On your Raspberry Pi (using a terminal window or via SSH) use these instructions or run ifconfig to discover your private IP address.
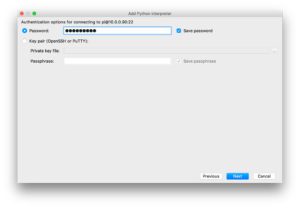
- On the device you’ll use to take control, download VNC Viewer. For best results, use the compatible app from RealVNC.
- Enter your Raspberry Pi’s private IP address into VNC Viewer:
How can I remotely access my Raspberry Pi without Internet?
Connect Your PC to Raspberry Pi Zero via USB Save and close, then eject the microSD card. You can then insert it into your Raspberry Pi Zero and connect it to your PC before booting the device. The connection should be via USB. Use raspberrypi.
Can Raspberry Pi be turned remotely?
The power output to the Raspberry Pi is toggled on or off with a single button press on the remote used to program the IRP1000. If the red LED is on, then IRP1000 shuts off the 5V on the output side. If the red LED is off, then IRP1000 turns on the power on the output side.
Can Raspberry Pi connect to mobile?
Connect to your Raspberry Pi with your Mobile/Tablet Attach a bluetooth Keyboard and you can have a mobile Linux computer at your disposal. Make sure that you are connected on the same WiFi network as your mobile device from your Raspberry Pi. Find the IP address of your Raspberry Pi using ifconfig. Here it is 192.168.
How can I remotely access my Raspberry Pi from anywhere?
If your tunnel status is online then you can open your Raspberry pi terminal using Shellinabox on a browser from anywhere. Open a browser in any computer or mobile phone that is connected to internet and type the address marked in the image onto the Browser's Address bar.
How do I turn on Raspberry Pi after shutdown?
Plug the power adapter into an outlet, connect the USB-C cable to it, then plug the other end into your Raspberry Pi. A red LED will turn on, and you'll see a rainbow screen followed by the Raspberry Pi OS desktop. From this point, if it's your first boot into Raspberry Pi OS, you'll go through some setup menus.
How do I access Raspberry Pi from Windows?
Otherwise, any other Raspberry Pi OS will do.Plug your SD card into your computer. ... [OPTIONAL] Format your SD card. ... Go to the RaspberryPi website and download the RaspberryPi Imager utility. ... Click on Choose OS. ... Click on Choose SD card. ... Make sure you have selected the right drive that holds your SD card!Check again!More items...
Introduction to Remote Access
Sometimes you need to access a Raspberry Pi without connecting it to a monitor. Perhaps the Pi is embedded in something like a robot, or you may want to view some information from it from elsewhere. Or perhaps you simply don’t have a spare monitor!
Setting up an SSH Server
You can access the command line of a Raspberry Pi remotely from another computer or device on the same network using the Secure Shell (SSH) protocol.
Secure Shell from Linux or Mac OS
You can use SSH to connect to your Raspberry Pi from a Linux desktop, another Raspberry Pi, or from an Apple Mac without installing additional software.
Secure Shell from Windows 10
You can use SSH to connect to your Raspberry Pi from a Windows 10 computer that is using October 2018 Update or later without having to use third-party clients.
Passwordless SSH Access
It is possible to configure your Raspberry Pi to allow access from another computer without needing to provide a password each time you connect. To do this, you need to use an SSH key instead of a password. To generate an SSH key:
Using Secure Copy
Secure Copy ( scp) is a command for sending files over SSH. This means you can copy files between computers, say from your Raspberry Pi to your desktop or laptop, or vice-versa.
Using rsync
You can use the tool rsync to synchronise folders between computers. You might want to transfer some files from your desktop computer or laptop to your Pi, for example, and for them to be kept up to date, or you might want the pictures taken by your Pi transferred to your computer automatically.
Create an account
To connect to your Raspberry Pi remotely you’ll need to set up an account. Open the web browser and head to https://remote.it. Click on ‘Sign up’ and enter your email address. You will be emailed a verification code. Enter this code and pick (and confirm) a password.
Update and install
Make sure your Raspberry Pi is connected to the internet (using wireless LAN or an Ethernet cable). Open a Terminal window and enter the following commands:
Register the Raspberry Pi
Open the web browser on your Raspberry Pi and navigate to http://find.remote.it. The window will search for devices running remote.it software (including your Raspberry Pi).
Start a connection
You now connect to Raspberry Pi via remote.it. There are two approaches: via a web service, or using remote.it’s dedicated software.
Connect via VNC Viewer
Open your VNC software (we’re using VNC Viewer) and choose File > New connection. Cut and paste the combined proxy and port information into the VNC server field. Ours looks like this: proxy50.rt3.io:31249.
Connect via app
The drawback to the web service is that all your data passes through a proxy computer. For a more private connection, the remote.it app for Windows and macOS enables you to form a peer-to-peer (P2P) connection.
Cloaking your port
You can access Raspberry Pi remotely using remote.it. However, your VNC port is now open and listening. You can check this with the lsof (list of files) command:
Step 1: Install the Remote.itPi Image
Download remote.itPi.img.zip to your computer if you haven't already, found here.
Step 2: Set Up Wi-Fi (Optional)
If you are connecting to your remote.itPi device to the internet via Ethernet, you can skip this step.
Step 4: Connect and Register
After scanning completes, you will see something like "1 of 1" or "1 of 2" above the displayed remote.itPi details. That represents " (current device) of (total devices)" which were found on your LAN. You can quickly access the remote.it Admin Panel of any devices you've previously configured using remoteit.
Step 5: Remotely Access the Pi
You can use the remote.it web portal to connect to your remote.itPi device. You can view your configured Devices on the web portal's "Devices" page.
Step 6: Conclusion
Now you will have remote access to a Raspberry Pi on the Network you've chosen. This means the Pi can serve as an access point to the other devices that are on that network!
Remotely Access Raspberry Pi behind firewall or NAT router
Directly connect to Raspberry Pi behind firewall from anywhere as if it was on the local network. Send command and batch job to raspberry pi from web portal. No need to discover the IoT device IP and change any firewall settings.
Remote monitoring and alerting for Raspberry Pi and IoT devices
Provides insight on CPU, memory and disk utilization. Determine when peak activity is happening on your application. Set up a CloudWatch alarm to send a notification when an event triggers a condition in one of your alarm policies.
Monitor SD card health and status
Arguably the most common problem for anyone using a Raspberry Pi is the effect of a corrupted SD card.
Low latency proxy server near you
Our global infrastructure provides a low latency and high availability network. You can specify a proxy server near your location. The Enterprise plan provide the dedicated server and higher bandwidth.
Access Raspberry Pi with Web based SSH client in your browser
With the web console, you can connect your raspberry pi directly from your PC browser or mobile device. The web console is a standard terminal emulator for the X Window System. The service has been encrypted using SSL session cache and leave a zero-attack surface.
Why Choose RemoteIoT?
RemoteIoT enables you to securely connect and manage machines and devices from anywhere. You can even connect to devices behind firewalls. All network traffic is encrypted via an SSH tunnel. No one can read the data in the tunnel, not even RemoteIoT.
Powerful Control Panel & APIs
Our easy-to-use interface allows you to manage machines from any kind of device!